
COINS Integration Overview & Requirements
Tenna’s integration with COINS ensures that contractors have a more complete data picture for bids, project management, maximizing profits, and improving employee performance. Share real-time data about your assets and sites to your ERP for total visibility over operations and their associated costs. Your team can make informed decisions with accurate data and customize options to fit your business model.
💥Integrations is a premium product and requires a separate license. Please contact your Account Manager for more information on premium product licenses or reach out to Customer Support at help@tenna.com or call 888.836.6269.
Data Flow
Enter Equipment Once
Enter a new piece of equipment in COINS and it will automatically show up in Tenna or allow the field to enter a pending piece of equipment in Tenna and it will show up in COINS. You choose the best process to work for your team.

Enter Jobs Once
Every job set up in COINS can automatically be added to Tenna. You can choose job status or utilize your own unique data field “Send to Tenna”. You choose the best solution for you.
View Utilization Updates Always
Capture hour and mileage readings for your assets and automatically update them from the machine into COINS from Tenna.

Benefits of Integration
- Field Productivity: Alert a project team when a piece of equipment arrives at a jobsite or when it is left behind.
- Accurate Job Costs: View up-to-date equipment listings to code equipment hours more easily and accurately.
- Visibility over Equipment Costs: Analyze and review equipment cost more accurately.
- Collaboration and Efficiency: Keep your office, shop and field teams connected sharing the same data. Eliminate static spreadsheets with efficient data sharing.
- Accountability: Increase accountability among field teams when using or handling assets to help control costs.
- Decision Making: Make educated decisions by taking appropriate action when assets are under (or over) utilized.
Integration Setup Instructions
The following setup/configuration must be done in the COINS environment prior to integration.
All work is to be performed by the customer or the customer’s consultant.
Suggested COINS Resources
- COINS consultant or subject matter expert
- Consulting/support time from COINS corporate
- COINS System Administrator/IT Resource
Prerequisites Before Sending Data to Tenna
Important! At least one COINS designer license is required to implement on the COINS side. This may require an additional cost based on your COINS license and/or agreement.
- 1
- Apply a patch to COINS (SSL related, potentially).
- 2
- Install Tenna SSL certificate into COINS.
- 3
- Pick and define a UD field for Assets and Jobs to become "Send to Tenna" controllers.
NOTE: COINS may only provide a limited number of UD fields (e.g. 10) so the customer is responsible for allotting the required UD fields for "Send to Tenna".
- 4
- Set up data sets for Assets and Jobs.
See the Setting Up Data Sets for Assets and Jobs section below for detailed steps.
- Include required fields per the information in this article.
- Include any optional fields.
- Include UD fields selected above named "Send to Tenna"
- 5
- Add the global database publish records for Assets and Jobs.
- 6
- Add a Tenna "send parameter".
- 7
- Configure email monitoring for processing errors.
- 8
- Add a background process to send data to Tenna.
- 9
- Configure the existing queues to ignore Tenna records (e.g. need to explicitly exclude Tenna messages from existing Main and Mobile queues and any other queues.).
Prerequisites to Receive Data from Tenna
Important! A webservices plan from COINS based on the number of assets is required. COINS will require an additional cost based on the number of calls and total data transfer size for new integrations. COINS service cost for ingesting data varies based on the customer's COINS license and/or agreement. Additional COINS licenses may be required based on the COINS license and/or agreement.
- 1
- Create the Hours, Miles, and Locations user-defined webservices.
- 2
- Set the PWDHASH system parameter to SHA-256.
- 3
- Verify that there are available licenses for users and concurrent users.
- 4
- Select the roles for the user making the webservice calls to allow the calls.
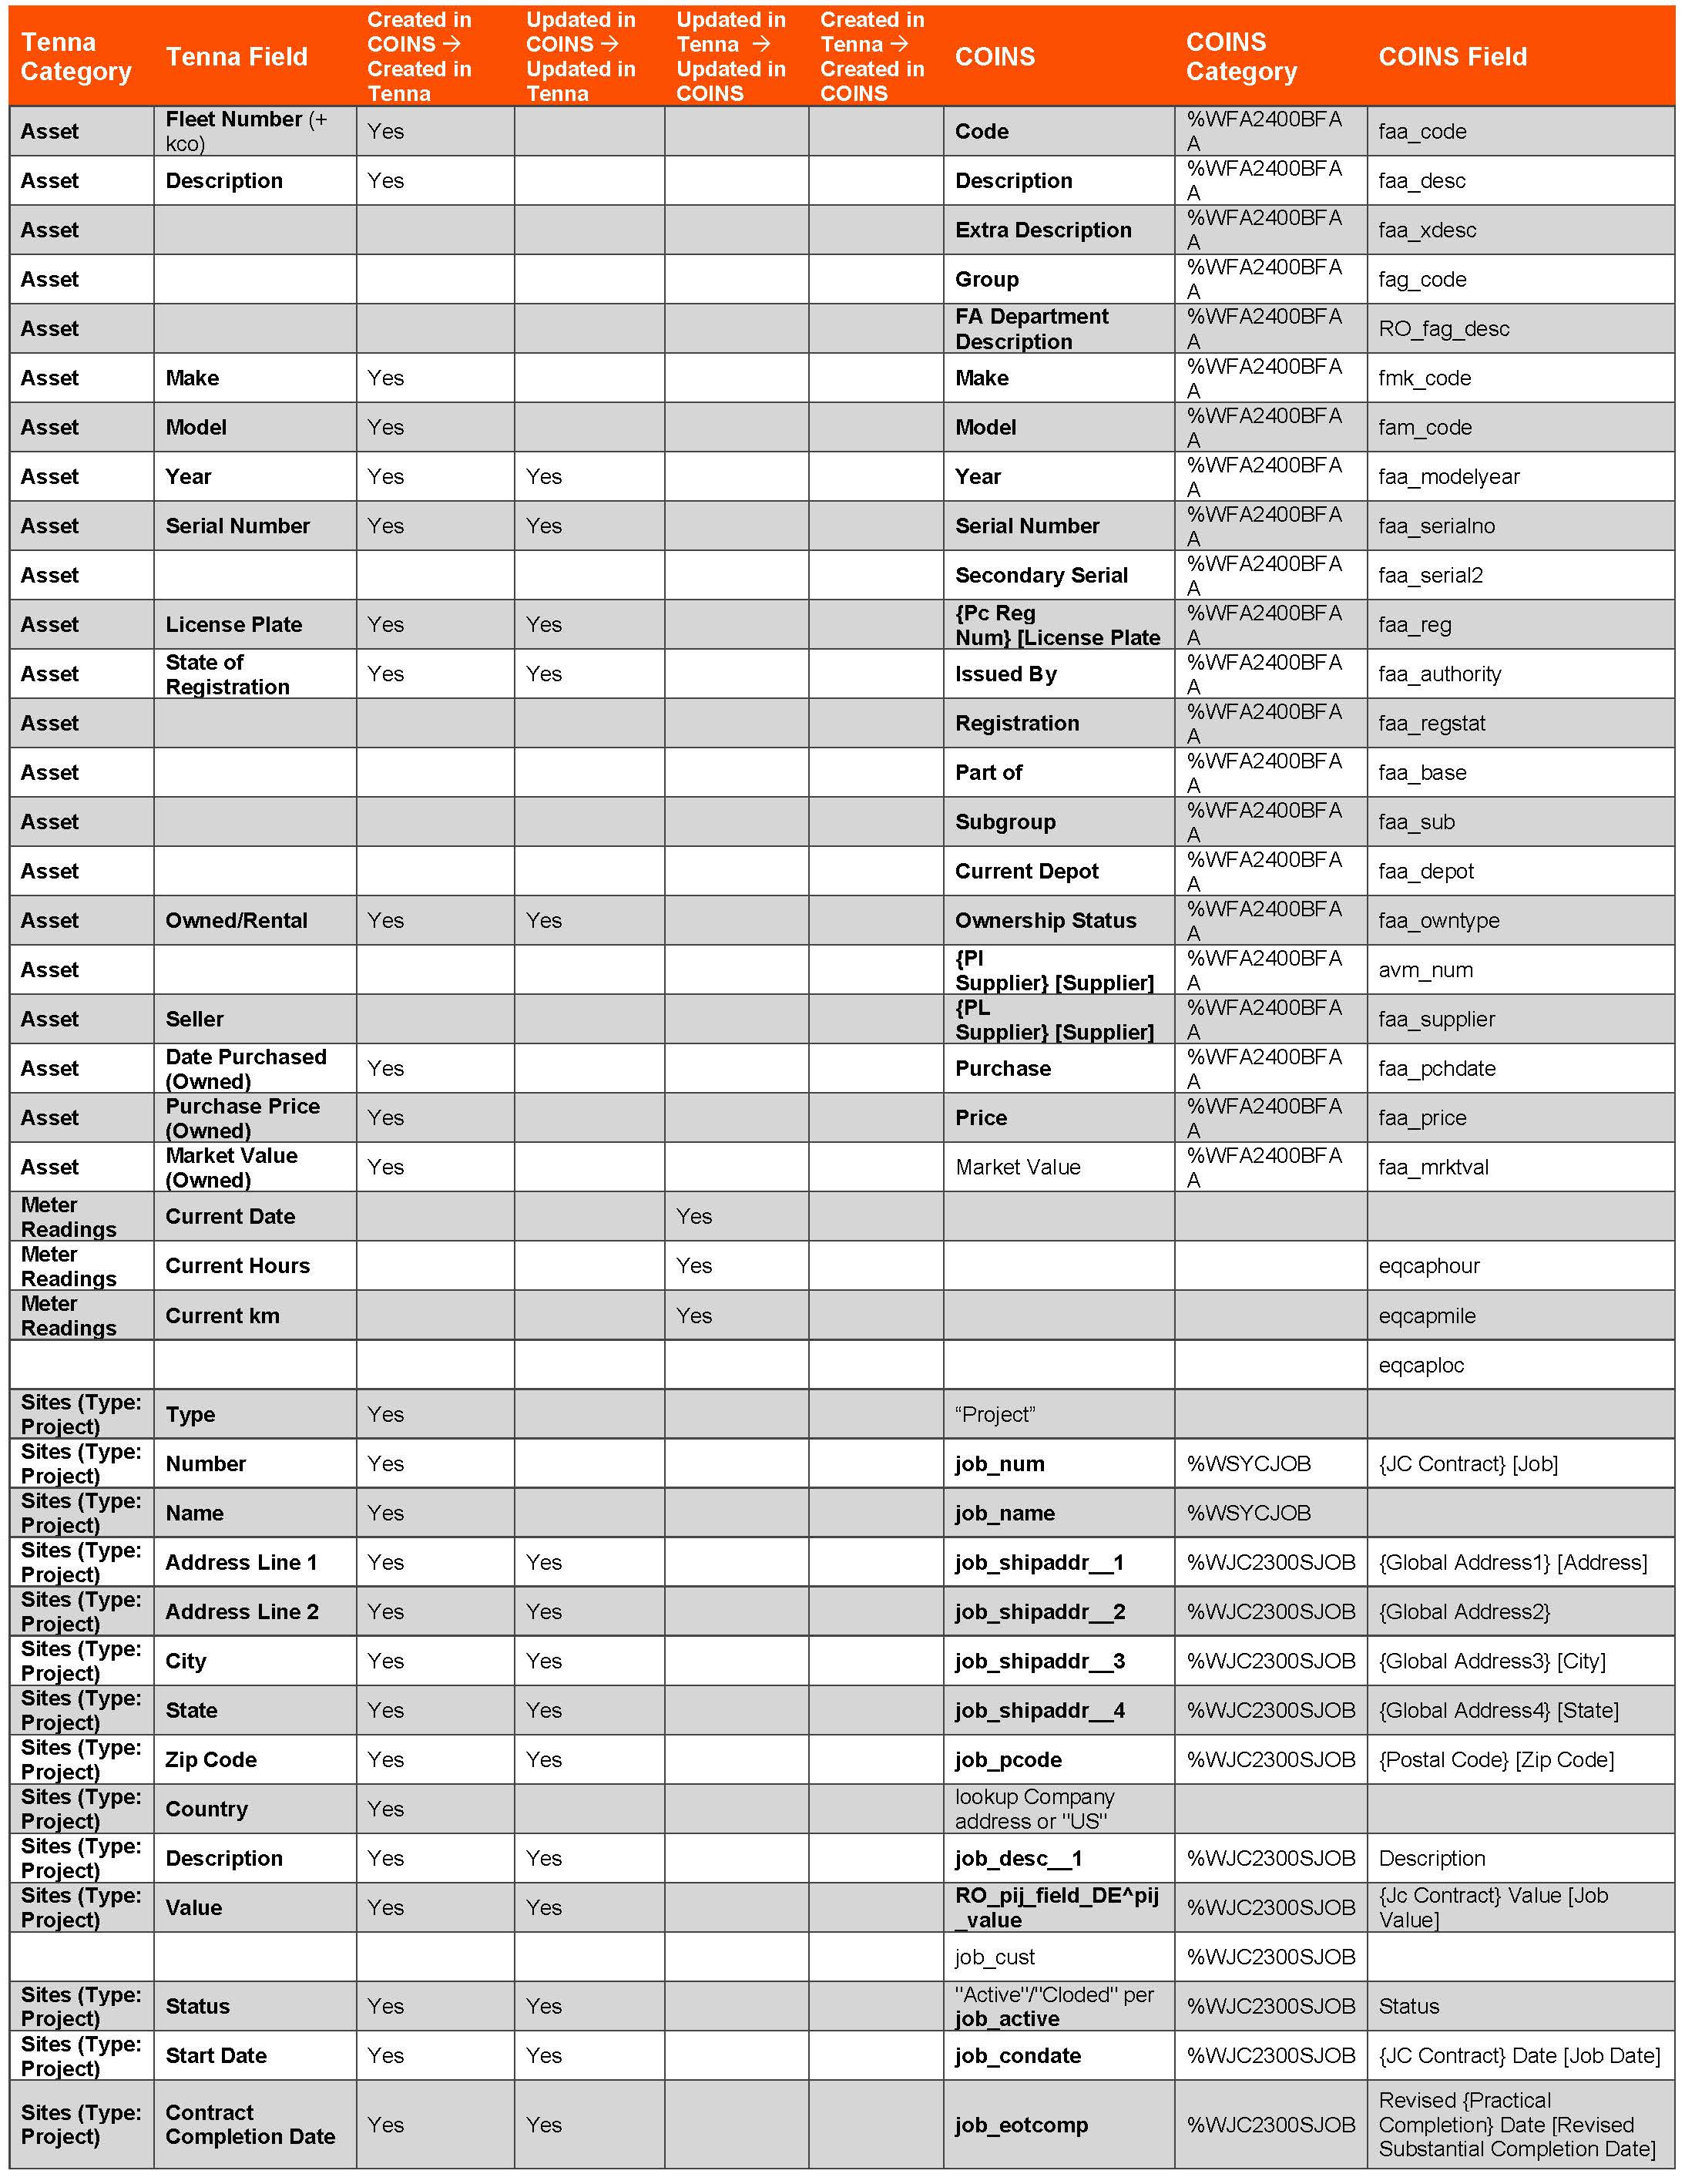
Field Mapping
IMPORTANT! Any information from COINS will overwrite the existing information in Tenna for the fields in the Field Mapping tables below.
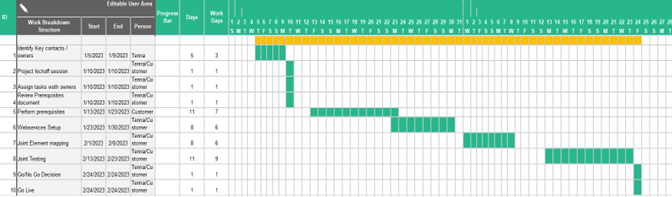
Expected Implementation Timeline
The timeline is an average of 30-50 days beyond kickoff. The following example assumes the activity starts the first of January 2023 and extends for 48 days.
Setting Up Data Sets for Assets and Jobs
- 1
- Create the WCUTENNAASSET and WCUTENNAJOB data sets as below. Note that the UD fields corresponding to the send_to_tenna fields will vary per client.
The following fields are required to be present in WCUTENNAASSET:
- faa_desc
- faa_xdesc
- faa_status
- faa_owntype
- fmk_code
- fam_code
- faa_modelyear
- faa_serialno
-
send_to_tenna
NOTE: Use an asset analysis set in COINS to create this field
The following additional fields are supported:
- faa_reg
- faa_regstat
- faa_pchdate
- faa_price
- faa_mrktval
The following additional fields are supported as part of the asset’s Special Comments field. To add to/remove from this set or to change these definitions, coordinate with Tenna.
- fag_code (as Asset Rate Group)
- fag_desc (Machine Type)
- faa_serial2 (Secondary Serial Number)
- faa_authority (License Issued By)
- faa_base (Part Of)
- faa_sub (Subgroup)
- faa_depot (Current Depot)
- avm_num (Seller)
- faa_supplier (Dealer)
- faa_weight (Weight)
- cmc_preftran (Preferred Transport)
- faa_footprint (Load Footprint)
All the WCUTENNAJOB fields listed are required.
NOTE: “Table Name” should be set to “fa_asset” for assets and “jc_job” for jobs.
- 2
- Add the 2 global database publish records.

- 3
- Go to the Main queue and configure it to not process any Tenna requests by adding "!tenna".
When step 2 is complete, changes to fa_asset and jc_job start to generate “Tenna” requests immediately. Completing step 3 keeps them from flowing to the main queue. The will still be queued, waiting for the Tenna background process to be created.

- 4
- Add a Send Parameter to define the endpoint for Tenna.
Reach out to integrations@tenna.com to obtain the URL.

- 5
- Add email addresses into the system param ESBMON.
This will send notices if the queue that pushes data to Tenna stops.
NOTE: Do not remove the USMobile email group.

- 6
- Add a background process that will do the actual send of the data to Tenna.
Additionally, in the Main queue, set it to not to process Tenna requests “!tenna”.
- 7
- Ensure that the user running the Tenna background process has job security set. This may require adding a user that has access to all jobs to the "User" field above.
- 8
- Once setup, click "START" and this will start the queue.
- 9
- Change a job and piece of equipment.
Outbound messages should show up in the outbound queue.

- If they process all the way to Tenna, they will be in the “Done” filter. Otherwise, they will be in the “New” filter.
- If the outbound queue stops, look at the log file in the ESB Send to review.
Follow the below steps to push in captions to an asset via a REST PUT call.
- 1
- Ensure PWDHASH system param is set to SHA-256.

- 2
- Check that you have All Services (%ESB) and All Custom Services (%ESB) role licenses for users and concurrent users.

- 3
- Check the roles for the user making the calls to allow the call.

- 4
- Create pages and functions for each type of caption.
In the examples below, there are captions for meter readings, hours, and Tenna locations, using captions 80, 81, and 90, respectively.
NOTE: Creating the page and parent function will only allow the GET calls. You must add the A, D, and U functions to enable the POST, DELETE, PUT, and PATCH calls. The Role Type for all functions must be SER-Service or the calls will not work. When creating the new functions, the Role Type field may not be available to edit unless the user is logged in with Super Administrator privileges. To get around this limitation, you can export the function/page definition, change the role type to SER in Notepad, and re-import the function/page definition.


The details shown below are for the hour parent add (A) function. All other parent functions are similar to the hour parent function; all other D and U functions are similar to the A function.

- 5
- Confirm the REST calls appear in the COINS REST documentation after adding all pages/functions. If they don’t appear, make sure the parent function for each of the A, D, and U functions is set to the non-A, D, U function.

NOTE: For questions, reach out to the Tenna Integrations Department integrations@tenna.com.