Sage300 Integration Overview & Requirements
Share real-time data about your assets and sites to your ERP for total visibility over operations and their associated costs. Your team can make informed decisions with accurate data, and customize options to fit your business model. Multiple company configurations within the same Sage300 instance are supported by Tenna and can be loaded into a single Tenna instance.
💥Integrations is a premium product and requires a separate license. Please contact your Account Manager for more information on premium product licenses or reach out to Customer Support at help@tenna.com or call 888.836.6269.
In this article:
Data Flow
Enhance your ERP with Tenna’s integration with Sage300™ to eliminate duplicate data entry and improve visibility.
Enter Equipment Once
Enter a new piece of equipment in Sage300™ and it will automatically show up in Tenna or allow the field to enter a pending piece of equipment in Tenna and it will show up in Sage300™. You choose the best process to work for your team.

Enter Jobs Once
Every job set up in Sage300™ can automatically be added to Tenna. You can choose job status or utilize your own unique data field “Send_to_Tenna”. You choose the best solution for you.

View Utilization Updates Always
Capture hour and mileage readings for your assets and automatically update them from the machine into Sage300™ from Tenna.

Benefits of Integration
- Field Productivity: Alert a project team when a piece of equipment arrives at a jobsite or when it is left behind.
- Accurate Job Costs: View up-to-date equipment listings to code equipment hours more easily and accurately.
- Visibility over Equipment Costs: Analyze and review equipment cost more accurately.
- Collaboration and Efficiency: Keep your office, shop and field teams connected sharing the same data. Eliminate static spreadsheets with efficient data sharing.
- Accountability: Increase accountability among field teams when using or handling assets to help control costs.
- Decision Making: Make educated decisions by taking appropriate action when assets are under (or over) utilized.
Partnership with Data Xchange
Tenna partners with Data Xchange to process transactions, ensuring your Sage300 system’s integrity and security. Data Xchange will install an agent on your server that will connect to your Sage300 system. Every 30 minutes, Data Xchange pulls data from your Sage300 system and reviews for any changes. If there are changes, Data Xchange triggers transactions to process the update into Tenna. Changes in Tenna are sent to Data Xchange in real time and processed to sync with Sage300.

New Assets in Tenna
New equipment or assets are entered in Tenna and automatically updated to Sage300. Our team will help streamline the initial seeding in Tenna with your existing Sage300 equipment.
Initial Asset Load
The Tenna-to-Sage300 integration allows for the initial seeding of assets to match what is already in your Sage300 system, thus ensuring a true synchronization from day one. This process involves steps that will validate accuracy and conformity before the data is loaded into Tenna.
The following steps must be taken prior to the Initial Asset Load:
- 1
- The Data Xchange agent is installed and connected to Sage300.
- 2
- The below Integration Setup Instructions are completed.
Once those items are completed, the following will occur:
- 1
- The Tenna Integrations team will perform an intial Sage300 cache load and review the assets as they are stored in Sage300.
- 2
- Validation steps are taken to check for any data that may cause issues in the Tenna platform.
- 3
- A review is set up with the Sage300 point of contact to go over any potential issues found and make corrections if needed.
- 4
- A sample of assets will be chosen and loaded into Tenna.
- 5
- Customer and Tenna will jointly review the assets in Tenna and agree on results or make changes.
- 6
- After the validation is completed, all assets selected to load into Tenna (via the Send_to_Tenna flag) will be released to populate Tenna assets.
- 7
- You will need to edit the assets in Tenna to add the correct category (all assets will come over with a category of "New from Sage300"), organization, and bill type. This step can be performed through a bulk edit if desired.
New Jobs in Sage300
New jobs or sites need to be entered in Sage300 and they will flow into Tenna. All jobs in Sage300 need to have a unique physical address so that Tenna can create the default geofence based on the Google geo coordinates of the address.
Initial Jobs Load
The Sage300-to-Tenna integration allows for the initial seeding of jobs to match what is already in your Sage300 system, thus ensuring a true synchronization from day one. This process involves steps that will validate accuracy and conformity before the data is loaded into Tenna.
The following steps must be taken prior to the Initial Asset Load:
- 1
- The Data Xchange agent is installed and connected to Sage300.
- 2
- The below Integration Setup Instructions are completed.
Once those items are completed, the following will occur:
- 1
- The Tenna Integrations team will perform an intial Sage300 cache load and review the jobs as they are stored in Sage300.
- 2
- Validation steps are taken to check for any data that may cause issues in the Tenna platform.
- 3
- A review is set up with the Sage300 point of contact to go over any potential issues found and make corrections if needed.
- 4
- A sample of jobs will be chosen and loaded into Tenna.
- 5
- Customer and Tenna will jointly review the sites in Tenna and agree on results or make changes.
- 6
- After the validation is completed, all jobs selected to load into Tenna sites (via the Sent_to_Tenna flag) will be released to populate Tenna sites.
- 7
- Each new site will render a default geofence which you will need to edit to match the actual job site. Each job needs to have a physical address in the record to render the default geofence with the address being the center point of the geofence.
Integration Setup Instructions
The following actions must be taken within Sage300 and Tenna to prepare for the integration to be activated.
Pre-Validation Steps
- 1
- Identify the data folder to be integrated with Tenna.
Currently, the integration can only support integrating a single Sage data folder to a single Tenna instance.
- 2
- The Asset-to-Tracker Match file is completed or updated with accurate asset information that matches Sage300.
- 3
- Provide extract of jobs from JC from Sage300. Tenna to validate extracts.
NOTE: If you want to load Sage300 extras into Tenna as sites, they must be included in this extract.
Data Xchange Setup Steps
- 1
- Send the following data to the Tenna Integration team to complete the Data Xchange onboarding request.
- Is the customer's Sage300 on-prem or cloud based?
- What data folder will be be integrating?
- Will the customer be using Extras? Tenna can load Extras as sites if desired.
- Who is the customer's primary contact for Sage300 knowledge? Please include email and phone number.
- Is there a primary IT person who would assist in the installation of the Data Xchange agent? If so, please provide email and phone number.
- 2
- Tenna to complete the Data Xchange onboarding form.
- 3
- Customer to acknowledge they have reviewed this Overview & Requirements article.
- 4
- Ensure the required steps have been performed for Data Xchange agent integration.
Sage300 Setup Steps
- 1
- Ensure "Send_to_Tenna" custom field on equipment is set up.
- 2
- If you intend to furnish catgories to Tenna through the integration, you must establish fields for the following:
- MajorCategory
- Subcategory1
- Subcategory2
- Subcategory3
These custom fields can be designated according to the specified nomenclature or can be tailored to align with your company's preferences. Kindly communicate the employed values to the Tenna Integration team for incorporation.
Subsequently, upon population of these values onto the equipment record, the integration mechanism will employ them to populate the corresponding categories within the Tenna system.
Important! The designated category must exist within the Tenna system; otherwise, the integration process will encounter an error, resulting in the default assignment of the category as "New from Sage300." It's pertinent to note that this integration exclusively operates during the asset creation phase within Tenna originating from Sage300. At present, it does not facilitate modifications to assets already existent within the Tenna system.
- 3
- Equipment needs to be updated in Sage300 to ensure the required fields in Tenna are populated in Sage. See below for the list of required fields.

- 4
- Ensure custom field is on Jobs: "Send_to_Tenna".
- 5
- Ensure custom field is on Extras: "Send_to_Tenna".
- 6
- Ensure EM Category is created in Sage300.
- Code = (your code)
- Description = "New from Tenna" (case sensitive)
- 7
- Ensure the Data XchangeAgent has been installed on the server with Sage300. The Data Xchange point of contact will assist in this setup and configuration.
- 8
- Ensure the SQL user setup request has been performed. The Data Xchange point of contact will assist in this setup.
- 9
- Ensure that the Data XchangeServiceUser is set up as a Viewpoint Sage300 User and assigned to all applicable Security Groups.
Tenna Setup Steps
- 1
- Create a new category named "New from Sage300" in Tenna with Type "Equipment". This is case sensitive.
See How to Create and Edit Categories for more information.
Field Mapping
IMPORTANT! Any information from Sage300 will overwrite the existing information in Tenna for the fields in the Field Mapping tables below.
Sage Equipment to Tenna Assets
Filters
If the customer has chosen to set up a custom field, “Send_to_Tenna" (database value = “Send_to_Tenna”), Sage Equipment records will be added to Tenna Assets when the following is true:
- Custom field, “Send_to_Tenna” = true
If the customer has chosen not to set up a custom field, Sage Equipment records will be added to Tenna Assets when the following is true:
- Equipment Status = “In Service” (case insensitive)
NOTE: Updates in Sage for License Plate, Registration Date, Designation, Purchase Date, and Purchase Price will only be sent to Tenna when the main Equipment record is updated in Sage. The Main Equipment record in Sage is updated frequently, meaning these values will flow to Tenna, but they may not flow immediately after the Sage sync.
If you do not have the license plate in Sage300, it will overwrite the license plate number in Tenna to be blank.
Sync Frequency
Every 30 minutes.
Data Mapping

Tenna Assets to Sage Equipment
Filters
Equipment records will be created in Sage when Assets are created in Tenna when the following is true:
- The fleet number in Tenna does not exist as an Equipment Number in Sage
- Category type is one of: “equipment”, “vehicle”, “truck”, or “attachment”
NOTE: If the License Plate changes in Tenna, a new record may be created in Sage as Sage has a many-to-one relationship between licenses and Equipment with the License Permit property as a key.
Sync Frequency
Near real time.
Data Mapping

Sage JC Jobs to Tenna Sites
Filters
If the customer has chosen to set up a custom field, “Send_to_Tenna”, Sage Jobs records will be added to Tenna Sites when the following is true:
- Custom field, “Send_to_Tenna” = true
If the customer has chosen not to set up a custom field, Sage JC Jobs records will be added to Tenna Sites when the following is true:
- Status is not equal to closed (not case sensitive)
Sync Frequency
Every 30 minutes.
Data Mapping

Sage JC Extras to Tenna Sites
Filters
If customer has chosen to set up a custom field, “Send_to_Tenna”, Sage Extra records will be added to Tenna Sites when the following is true:
- Custom field, “Send_to_Tenna” = true ;
If customer has chosen not to set up the custom field, “Send_to_Tenna”, Sage JC Jobs records will be added to Tenna Sites when the following is true:
- Job Status != closed (not case sensitive)
Sync Frequency
Every 30 minutes.
Data Mapping

Tenna Meter Readings to Sage Equipment Meter Readings
Filters
Any Assets in Tenna with an Hours or Miles value greater than the Meter Odometer value in Sage300 will overwrite the data in Sage300.
Sync Frequency
Once daily, Monday-Friday, at 5:01am Central Time.
Data Mapping

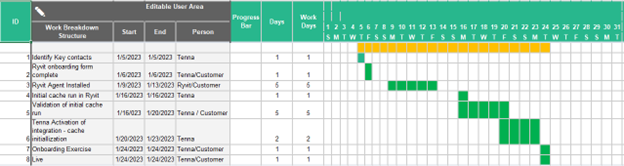
Expected Implementation Timeline
The timeline is an average of 10-20 days beyond kickoff. The following example assumes the activity starts the first of January 2023 and extends for 17 days.
NOTE: For questions, reach out to the Tenna Integrations Department integrations@tenna.com.