How to Install and Associate Action QRs
This article gives best practices for installing Action QR labels on your asset, as well as how to associate the label to an action in Tenna.
Important! Action QRs are color-coded for your convenience. Your organization may choose to, for example, have all yellow Action QRs associated with inventory parts. Ensure that there is an established protocol for which colors are associated with which actions prior to installing.
In this article:
How to Install an Action QR
Tools and Materials Required
- Mobile device with Tenna App installed
- Acetone-based cleaner
- Clean, absorbent rags or towels
Tools and Materials below are required for Action QR Tag only:
- Materials for your chosen mounting method (screw, tape, epoxy or rivet) as listed below
- For screw mounting:
- (2) #8 x 3/4-inch 410 stainless steel self-tapping screws
- Impact driver and 1/4-inch bit
- For tape mounting:
- Cutting tool (scissors, side cutters, or knife)
- Double-sided Very High Bond (VHB) tape
- 3m primer pen
- Butane torch to heat surface (if installing in temperatures blow 50°F)
- For epoxy mounting:
- JB weld/epoxy
- Two-part epoxy syringe
- Stirring implement
- For rivet mounting:
- Drill
- 1/8” Drill bit
- Rivet gun
- Two 1/8” rivets
- For screw mounting:
Installation Instructions
Step 1. Identify the best location to adhere the Action QR.
Suggested locations include inside the asset’s door, near the fuel tank, near the ignition, etc.
Pro Tip! Find a location that will be convenient based on the action. For example, near the fuel tank if the action will be associated with creating a fuel entry.
Important! Action QR are designed to adhere permanently. Attempting to remove the label from the asset will likely render it unusable, so choose the location wisely.

Step 2. Clean the selected location.
- Scrape any loose debris from the surface.
- Use the acetone-based cleaner to remove grease, oil, and dirt from the location.
- Wipe the area dry with a clean, absorbent rag or towel.

Step 3a. If installing an Action QR label:
In the white space, write an action keyword on the Action QR using a permanent marker.
This assists the operator performing the action with identifying the action associated with the label, especially in the instance of more than one Action QR on an asset.
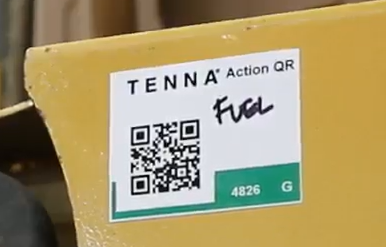
Attach the Action QR label to the asset.
Remove the Action QR label from the sheet.

Adhere to the cleaned surface.

Step 3b. If installing an Action QR Tag:
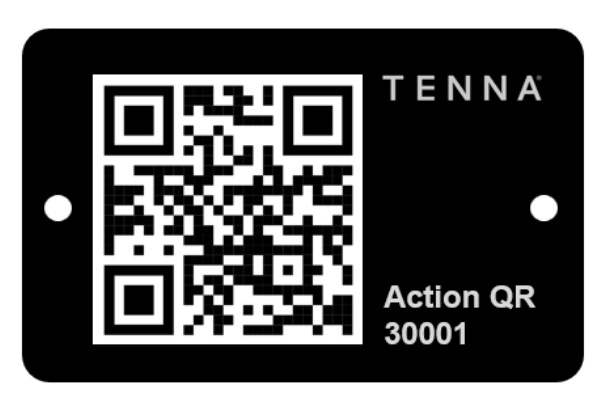
Follow the instructions for screws, VHB tape, or epoxy, depending on your preferred mounting method.
For best scanning results:
- Place the Action QR tag as straight as possible.
- Orient the Action QR tag so that the Tenna logo will be right-side up when you scan the tag.
Using self-tapping screws
Note: You can use self-tapping screws to mount the Action QR tag on steel that is up to 1/8-inch thick. For thicker steel, use VHB tape or epoxy instead of screws.
- Position the Action QR tag against the clean, dry surface of the asset.
- Using the appropriate bit size, pre-drill holes to avoid breaking self-tapping screws.
- Using an impact driver and 1/4-inch bit, drive the screws through the tag’s mounting holes and into the asset.

Using VHB tape
IMPORTANT: The ambient temperature must be above 50°F to ensure proper adhesion.
- Adhere VHB tape to the back of the Action QR tag and cut the tape to fit.

- Remove the backing from the VHB tape.
- Following the tape manufacturer’s recommendations, adhere the Action QR tag to the clean, dry surface of the asset.
Using epoxy
- Following the epoxy manufacturer’s instructions, dispense about a quarter-sized amount of epoxy directly onto the clean, dry surface where you will mount the tag.

- Thoroughly mix the epoxy resin and hardener to activate it.
- Spread the epoxy so that it covers an area that is slightly smaller than the size of the tag.
Note: Do not use excess epoxy to avoid leakage.
- With the Action QR side facing up, place the tag on the epoxy and apply pressure.

- Wait for the epoxy to set (usually five to ten minutes depending on the epoxy type and the ambient temperature).
Note: Wait for the epoxy manufacturer’s recommended cure time before using the asset.
Using rivets
- Mark the hole locations using your Action QR tag.
- Drill holes to match your rivet size.
- Fasten rivets with rivet gun.
How to Associate an Action QR to an Asset and Action
- Open the Tenna App and log in.
- Select the camera icon to open the QR scanner.

- Scan the new Action QR.

- Tap "Start Installation".
- Choose the color that coordinates with the Action QR.
- Select to assign the Action QR to an Asset or Inventory Part.

- Search for and select the asset or inventory part.

- Select the action being assigned to the Action QR.

- Select “Install Action QR” to complete.