
How to Create a Job (Desktop)
Jobs can be created individually or via the Bulk Import process. This article details how to create an individual Job, including all required and optional fields, best practices, and FAQs.
Permission Requirements:
- Users with the “View Jobs” permission enabled can access the All Jobs page.
- Users with the “Create Jobs” permission enabled can create new Jobs.
💥Jobs - Financials is a premium product and requires a separate license. Please contact your Account Manager for more information on premium product licenses or reach out to Customer Support at help@tenna.com or call 888.836.6269.
In this article:
How to Create a Job
Jobs can be created from any view in the All Jobs page.
The following are details on how to create a single job. For details on bulk importing multiple jobs at once, view How to Bulk Import Jobs (Desktop).
- 1
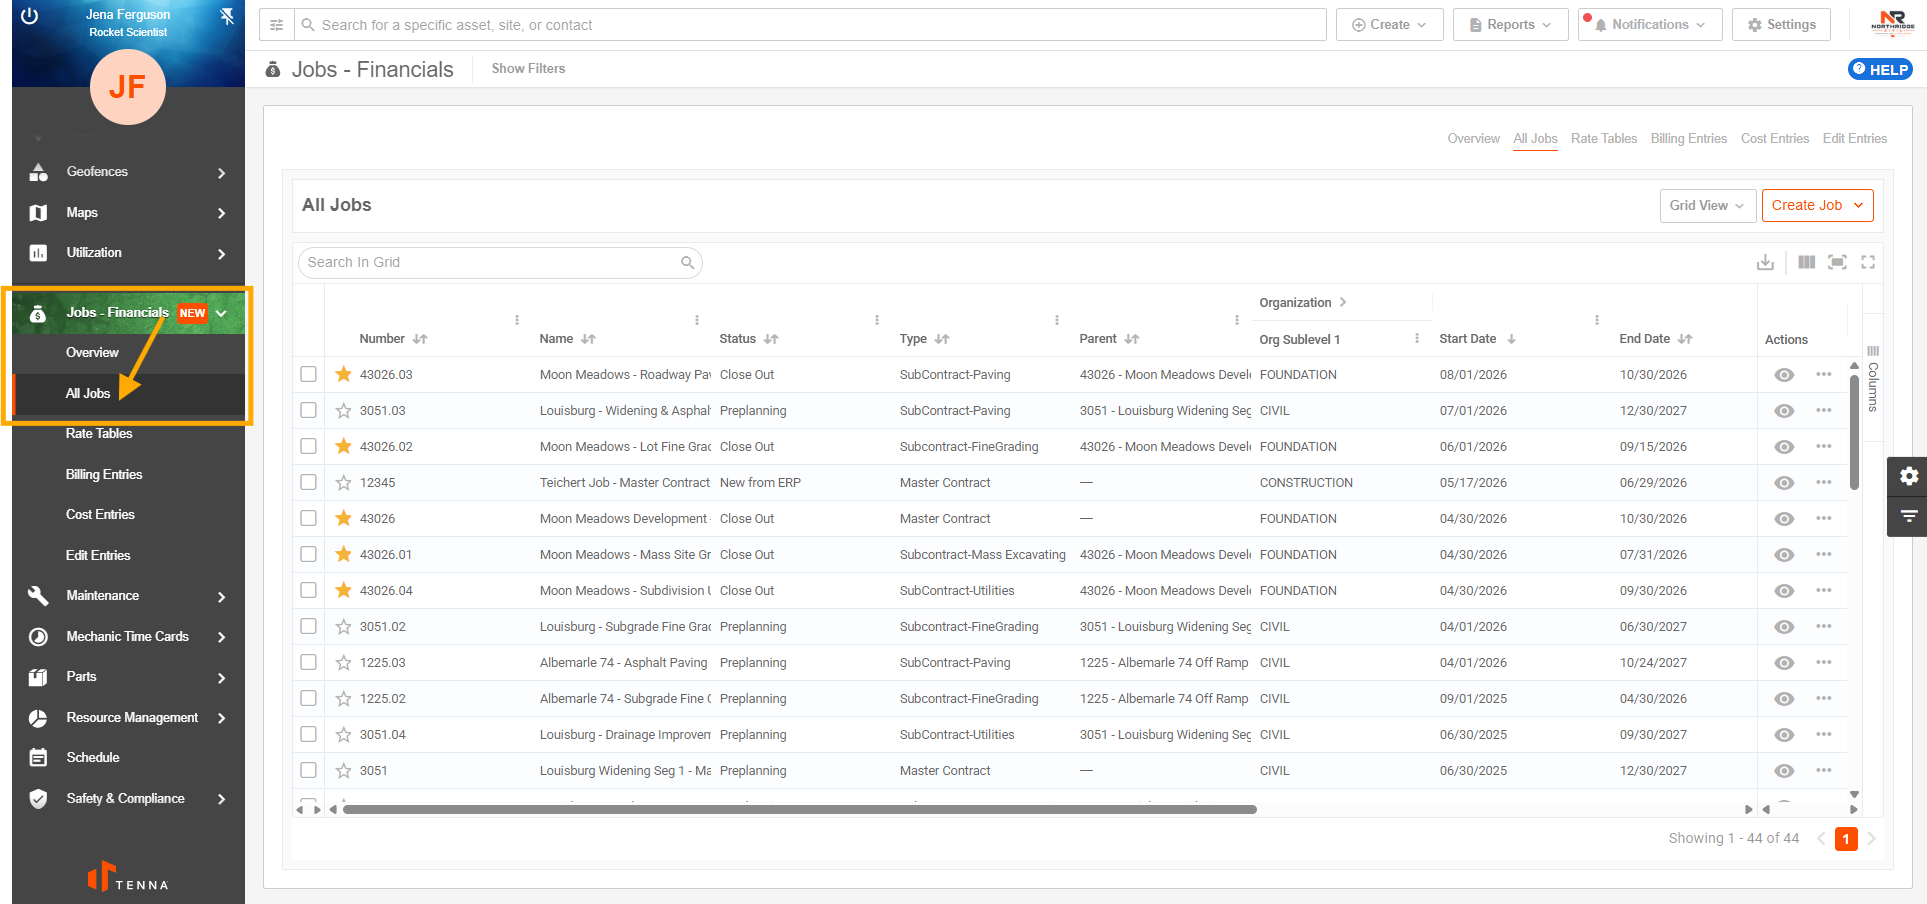
- Click "Jobs - Financials" on the left-side navigation, then click "All Jobs".
- 2
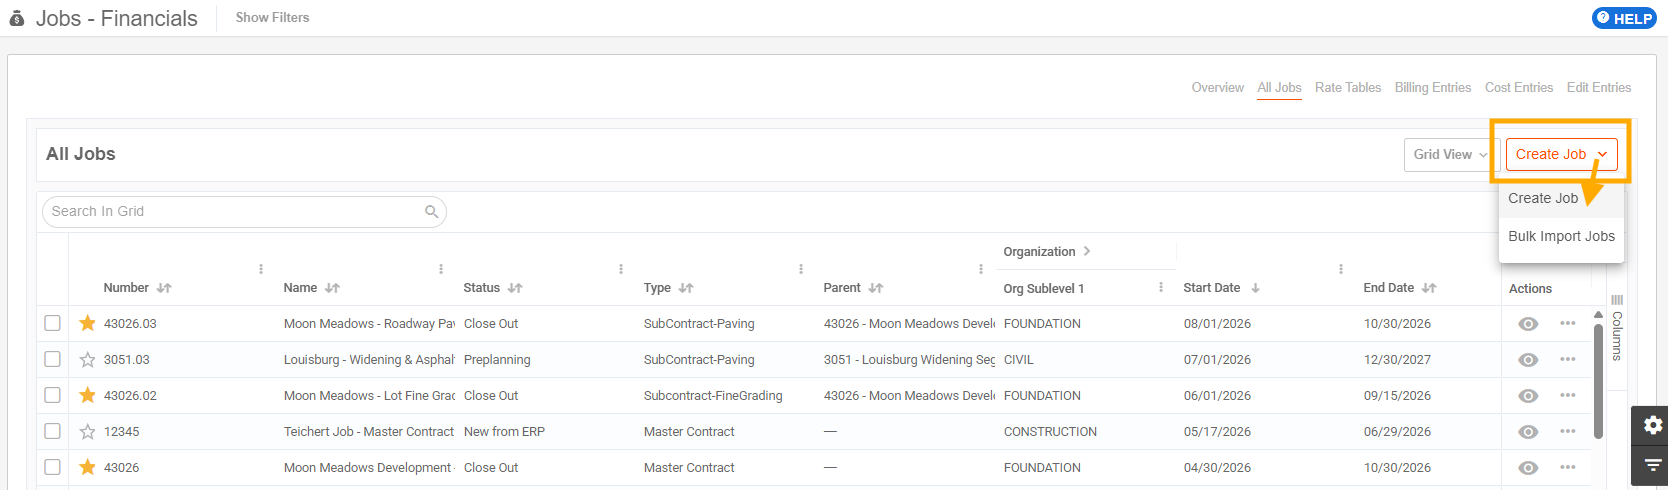
- Click "Create Job" on the top, right corner. Then, click "Create Job" in the drop-down.
Pro Tip!
To create a Sub-Job, click the dotted icon next to an existing job and click "Create Job". This will open the Create Job form with the selected job as the Parent Job.

- 3
- Enter important Job Info.
*Required fields.
- *Job Number: Alphanumeric number for the Job entered by the user when created or by ERP via integration.
- *Job Name: Name for the Job entered by the user when created or by ERP via integration.
- *Job Status: Selected from existing Job Statuses.
Important! Jobs with an Inactive Status cannot be selected under geofences for automation.
- Job Type: Select from existing Job Types.
- Description: Enter a description of the job.
- Parent Job : Select an existing Job to be the Parent job. This makes the job you are creating a Sub-Job.
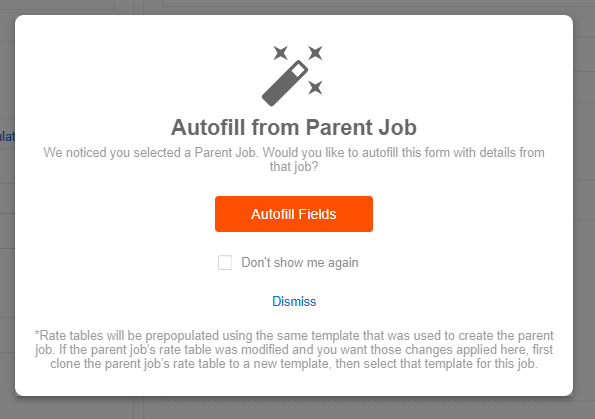
Note: Selecting a Parent Job will give you the option to populate the rest of the Job form with details from the Parent Job. Click “Autofill Fields” to do so. If you prefer to fill out the form yourself, click “Dismiss”.
- Organization: Select an organization from the account’s Org Chart (subsidiary, division, department).
- 4
- Select to enable Billing and/or Costing and select Rate Tables.
Click the toggle next to “Turn on Billing” and/or “Turn on Cost” to enable Billing or Costing.
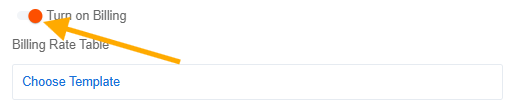
If enabled, click “Choose Template” for each (Billing, Costing, or both) to select a Rate Table Template.
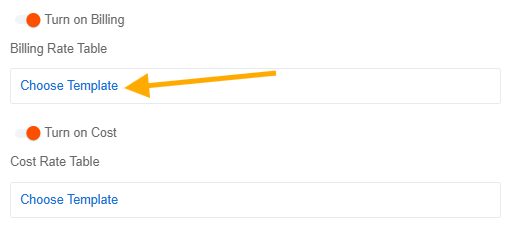
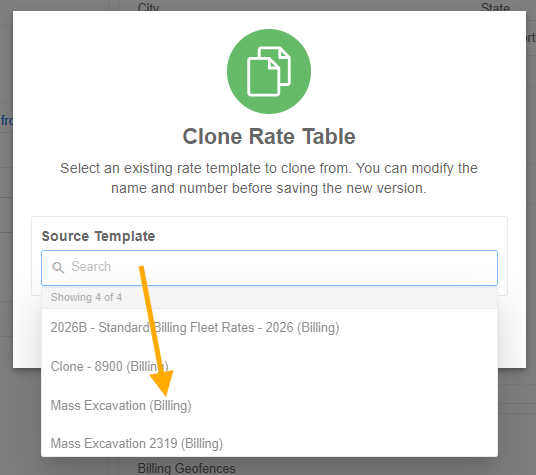
Select a Rate Table Template to use to create the Job Rate Table.
View How to Configure Rate Table Templates for more information.
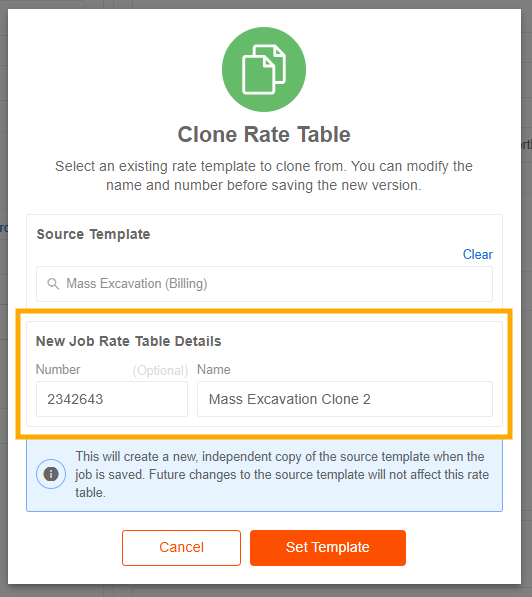
Give the new Job Rate Table a number (optional) and new name (optional).
Click “Set Template” to complete.
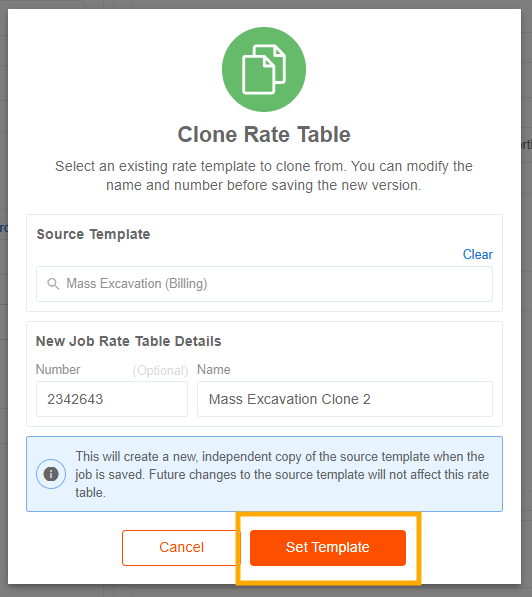
Important! The Job Rate Table was created by cloning an existing Rate Table Template. Once the Job has been created, you may go to the Rate Table and edit the rates for this specific job, if necessary.
View How to Edit a Rate Table for more details.
- 5
- Enter General Information.
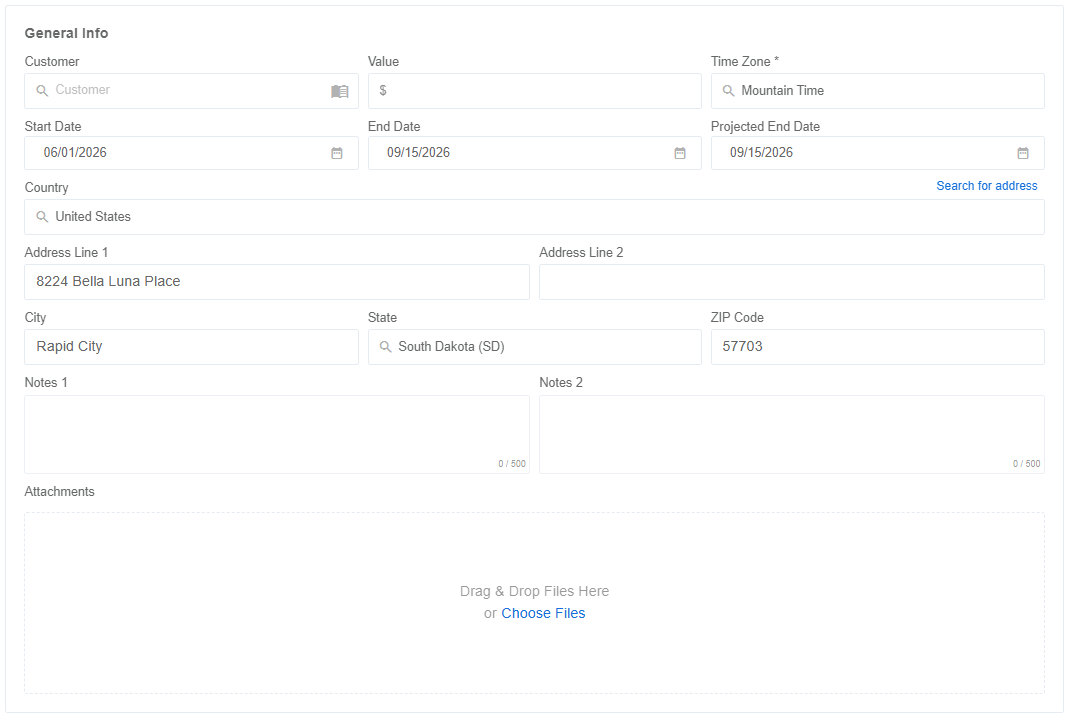
- Customer: Choose from Tenna users, contacts, or companies.
- Value: Dollar value of the contract.
- *Time Zone: The Job’s time zone.
- Job Start and End Dates: The planned start and end dates of the job (the target date). This is usually set in the baseline schedule or contract.
- Projected End Date: The completion date the job is currently expected to achieve based on actual progress, delays, productivity, and current forecasts.
- Address: Enter the Mailing Address of the Job.
- Notes: Shows any notes that were added to the Job.
Pro Tip! Utilize the Notes 1 and Notes 2 sections to add any additional job information that does not have a designated field.
- Attachments: Add attachments to the Job.
Note: Users may upload up to 10 files at 20MB per file. However, only 20MB can be uploaded at a time. So, larger attachments may need to be uploaded one at a time.
- 6
- Apply Automation Rules.
Select Billing and/or Costing Geofences from the drop down. Users may select any geofence.
A Job can be assigned multiple Billing and Costing geofences.
Note:
Costing Geofences will only show if the account has “Show Costing” enabled.
Billing Geofences will only show if the account has “Show Billing” enabled.

Pro Tip! Review the FAQs below for best practices on assigning automation rules.
- 7
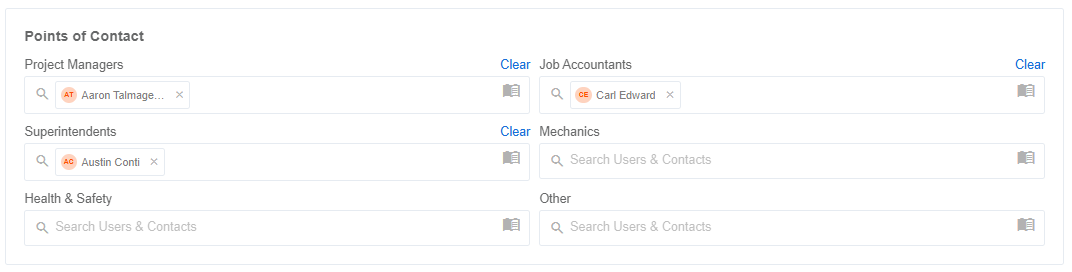
- Establish Points of Contact.
Chosen POCs of the Job (Tenna Users or Contacts) that include Project Managers, Superintendents, Job Accountants, Mechanics, Health & Safety, and other contacts assigned to the job.
- 8
- Click "Create Job" at the top right of the form to complete.
FAQs
Which fields are auto-filled from a Parent Job, if chosen to do so?
- Organization
- Customer
- Mailing Address
- Points of Contact
- Start Date
- End Date
- Project End Date
- Turn On Billing
- Turn On Cost
- Default Time Zone
Will you override fields I have already populated in the form if I select to auto-fill from the Parent Job?
No. Anything already filled out in the Create Job form when you select to auto-fill from the Parent Job will remain in the form.
What do automation rules do?
Automation rules connect a job to Billing and/or Costing geofences so job activity can be categorized automatically when assets, users, or equipment activity occurs within the selected geofence area.
When should I apply automation rules?
- Apply automation rules when the job has a clearly defined physical work area that matches an existing geofence.
- Apply Billing geofences when activity in that area should be billed to the job.
- Apply Costing geofences when activity in that area should be costed to the job.
- Apply both Billing and Costing geofences when the same job location should drive both billing and costing workflows.
- Apply multiple geofences when the job spans multiple approved work areas or locations.
When should I avoid applying automation rules?
- Do not apply automation rules if the job does not have a geofence that accurately represents the work area.
- Do not apply automation rules if the job status is inactive, since inactive jobs cannot be selected under geofences for automation.
- Do not apply automation rules if billing or costing should be assigned manually for this job.
- Do not apply automation rules if you are unsure whether the selected geofence is used for Billing, Costing, or both.
Can I assign more than one automation rule to a job?
Yes. A job can be assigned multiple Billing and Costing geofences when more than one geofence applies to the job.
Why can’t I see Billing or Costing geofences?
Billing Geofences only appear when the account has “Show Billing” enabled. Costing Geofences only appear when the account has “Show Costing” enabled.
What should I check before saving the job?
- Confirm the job status is active.
- Confirm Billing and/or Costing is enabled on the job if the automation rule should support those workflows.
- Confirm the selected geofence matches the job’s actual work area.
- Confirm whether the job needs Billing geofences, Costing geofences, or both.
Best practice: If you are unsure, leave automation rules unassigned until the correct geofence and billing/costing workflow are confirmed. This helps prevent job activity from being categorized incorrectly.