TennaINTEL S1 Tracker Installation
The below are instructions for installing TennaINTEL S1 (#BEW-INTL-S1) tracker.
Important! We strongly recommend that Tenna hardware only be installed by a Tenna Certified mechanic. Contact your Tenna Rep to learn more about our Mechanic Certification program.
Pro Tip! Review our Tracker Installation Best Practices before installing a Tenna tracker.
In this article:

Safety Information
Warning
- Follow established safety precautions for operating and servicing the equipment on which you are installing this Tenna product.
- Do not mount the tracker where it may interfere with an asset’s safety guards or shields.
Caution
- Re-tighten any screws loosened during installation.
- Replace any safety devices removed during installation.
Important Installation Notes
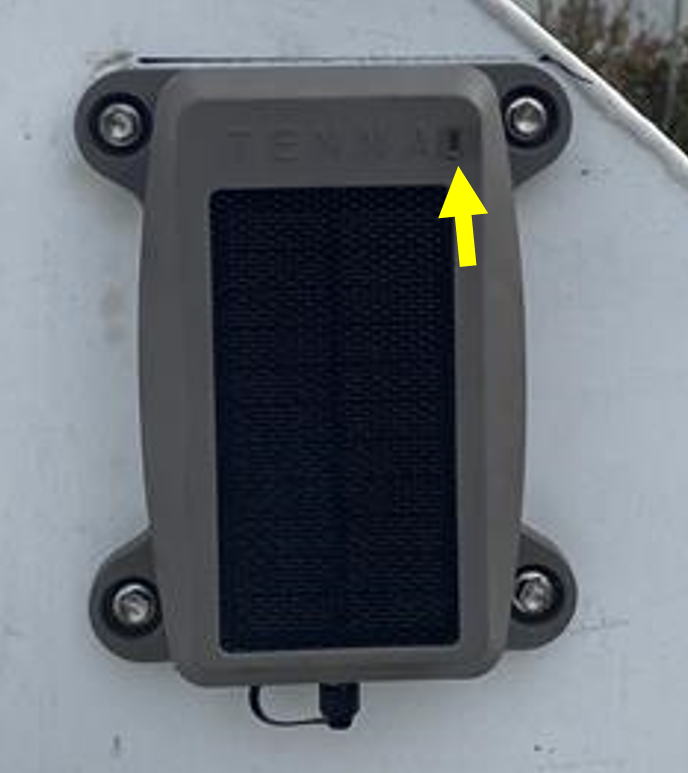
- The TennaINTEL S1 tracker ships with a light-blocking sticker secured to the top of the tracker. Do not remove this sticker until prompted in the installation instructions.
- To ensure proper adhesion, only apply VHB tape in temperatures above 50°F. A butane torch can be used to heat metal mounting surfaces prior to applying the VHB tape.
- This product is powered by an internal rechargeable lithium battery. Recycle or dispose of lithium batteries in accordance with applicable local, state, and federal regulations.
Tools and Materials Required
- Mobile device with Tenna App installed
- Laptop or desktop PC for verification
- Acetone-based cleaner
- Clean, absorbent rags or towels
Materials for your chosen mounting method (screw, magnet, or tape) as listed below:
For screw mounting:
- Stainless steel self-tapping screws (included)
- Impact driver 5/16” bit
For magnet mounting:
- Mounting kit (includes 4 magnets) (#CAT-MKIT-4M) *Must purchase in advance from Tenna
- Phillips screwdriver
- 8-mm wrench or socket
For tape mounting:
- Cutting tool (scissors, side cutters, or knife)
- 3M VHB Tape 4932 (or equivalent)
- Butane torch to heat surface (if installing in temperatures below 50°F)
- 3M primer pen
Hardware Included
- TennaINTEL S1 (#BEW-INTL-S1)
- (4) #12 x 1” 304 stainless self-drilling screws
- (4) Hex washer heads
Installation Steps
Step 1: Link the Tracker to the asset in the Tenna App
- Go to where the asset is located (so that you can see and touch the asset).
Pro Tip! Being in physical proximity to the asset helps ensure that you link the tracker to the intended asset.
- Open the Tenna App on your mobile device and log in.
- There are two ways to add the tracker to the asset you are installing on:
- Using the Search function, find and select the asset that you want to track with this tracker. From the Asset page, tap Add Tracker.

- Or, select the camera icon to open the QR scanner. Scan the QR code on the tracker. Then, select the asset.

- Follow the prompts along with these installation instructions.
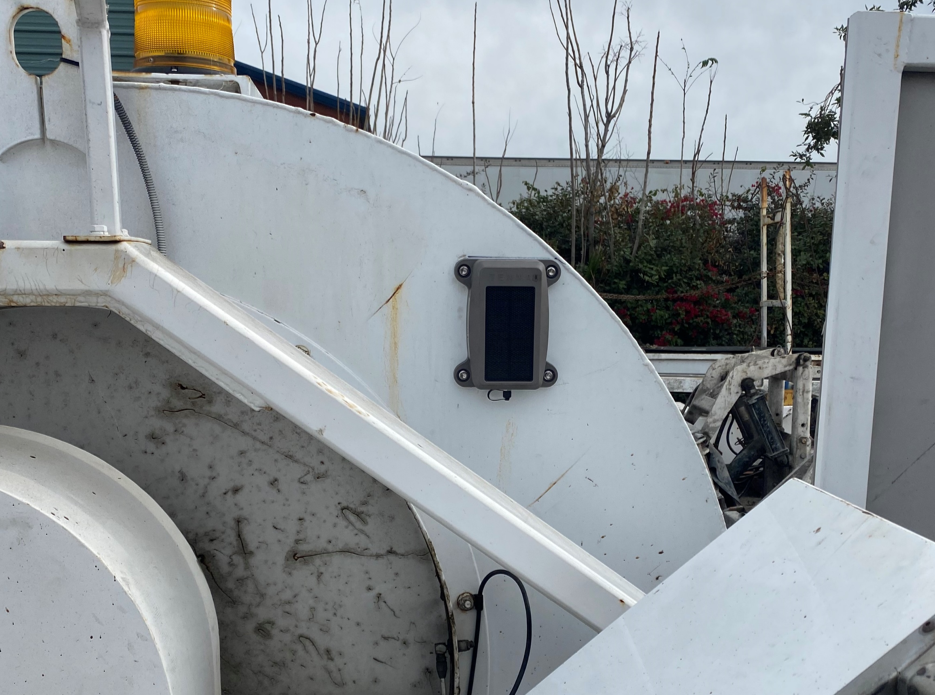
Step 2: Determine the location on the asset to install the tracker
Select the best location for the tracker.
✅ Do:
- Ensure the tracker’s top surface has a clear view of the sky.
- Mount the tracker horizontally (for example, on the roof of the equipment cab). Vertical mount is okay as long as the tracker has clear sky visibility.
- Mount inside the equipment’s cab if there is still clear sky visibility.

Do Not:
- Mount the tracker under the asset or under the dashboard.
- Choose a location where the tracker is likely be damaged or knocked off during normal operation of the asset.
- Enclose the tracker in a metallic housing or cabinet.
- Screw the tracker to a location that backs up to coolant lines, radiators, electrical wiring, fluid tanks, or moving components.
Step 3: Clean the selected location
- Scrape any debris from the surface.
NOTE: If using VHB tape to mount, ensure that the location is in good condition (no chipping or old paint, no concrete-stained surfaces, or rough/bumpy surfaces).
2. Use the acetone-based cleaner to remove grease, oil, and dirt from the mounting location.
3. Wipe the area dry with a clean, absorbent rag or towel.

Step 4: Activate the tracker
Important! The TennaMINI 2.0 Solar tracker ships with a light blocking sticker secured to the top of the tracker. This sticker must be removed from the tracker to activate it.
- Remove the sticker located at the top of the device covering the light sensor.

- Shake the tracker vigorously two to three times to activate it.
- Hold the device’s light sensor up to direct sunlight for three seconds before mounting.

📸 Capture Installation Photos in Tenna App
At this point, you are required to capture photos of the installation in the Tenna App. These photos are very important for troubleshooting in the future. Make sure the photo is clear (not blurry) and well-lit.
- Take a close-up photo showing that the "peel here" decal has been removed from the tracker.
- Take a photo further back to show where the tracker is mounted on the asset.
Step 5. Verify the tracker.
Pro Tip! We recommend verifying the tracker prior to mounting. This ensures the tracker is online and working properly and allows troubleshooting prior to permanently installing.
- Complete the remaining steps presented in the Tenna App to finalize the installation.
- Then, open Tenna on your laptop or desktop computer to complete Tracker Verification.
Step 6. Mount the tracker on the asset.
Follow the instructions below for screws, magnets, or VHB tape, depending on your preferred mounting method.
Using self-tapping screws
You can use the provided self-tapping screws to mount the tracker on steel that is up to 1/8-inch thick. For thicker steel, use machine screws, magnets, or VHB tape.
Important! Do not drive screws into coolant lines, radiators, electrical wiring, fluid tanks, or moving components.
- Place the tracker on the desired location on the asset.
- Using an impact driver with a 5/16-inch bit, drive the provided self-tapping screws through the mounting holes of the tracker into the asset.

- Ensure that each screw is seated securely.

Using magnets
The provided industrial strength magnet kit (#CAT-MKIT-4M) is a useful mounting option if the equipment is a rental, if it might be sold, or if you might want to re-purpose the tracker in the future.
- Insert a provided screw into the magnet from the underside (so that the blunt tip of the screw protrudes from the top side of the magnet).

- Insert the screw/magnet combination up through one of the mounting holes of the tracker (from the bottom of the tracker toward the top).

- Place one of the provided self-locking nuts onto the machine screw where it protrudes on the top side of the tracker; then tighten the nut securely.

- Repeat to attach each remaining magnet to the mounting holes.
- Place the tracker to the desired location on the asset.

Using VHB tape
Important! The ambient temperature must be above 50°F to ensure proper adhesion. Butane torch recommended for lower temperatures to heat metal mounting surface.
- Turn the tracker upside down to expose the underside.

- Measure the VHB mounting tape to cover the entire bottom of the mounting surface.

- Cut the tape to fit so that it does not extend beyond the ends of the tracker.

- Prime the selected location using a 3M primer stick.
- Remove the backing from the VHB tape.

- Following the tape manufacturer’s recommendations, adhere the tracker to the clean, dry surface of the asset.